
DIY Savage Axis Trigger Job
Warning: screwing around with your trigger comes with some risk. You should have a good idea of what the rifle trigger should be doing, have a bit of mechanical sense, and test rigorously afterwards. If you adjust your trigger according to this content, you take responsibility for your modifications. If you’re not comfortable with the risk, or don’t feel your mechanical aptitude is strong enough, take your rifle to a gunsmith.
A while ago I cut the stock trigger spring on my Savage Axis, and found it did lighten the trigger to a reasonable weight. Having to deal with that annoying amount of overtravel was another story. To get rid of it I could have gone out and bought a Rifle Basix or a Timney aftermarket trigger. But, hey, I’m on a budget! So I searched online and found an affordable fix that was simple and only needed parts from any hardware store.
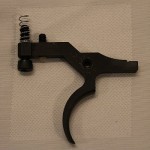
Cutting the coil:
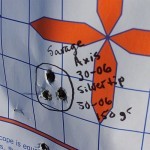
As we all know, the stock Savage Axis trigger feels heavy, measuring around 7½lbs. The best I could get using Federal Blue box, 30-06, 150 grain ammo at 100 yards was 1½” groups. When looking at the trigger assembly on the bench, I found that there was absolutely no takeup with the bolt locked in position and that the break length was very short. It seemed to me that it had the potential of being an excellent trigger. Figuring if I adjusted the weight of the trigger, it would be enough for accuracy to improve. I ended up cutting the top two coils of the stock trigger spring to reduce the weight to 4lbs and found the groups had shrunk to 1¼” with the same ammo.
Parts to buy:
Being on a budget, I searched for parts that had the best bang for their buck. What I have used and where I got them is listed below.
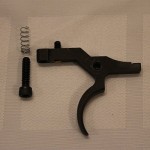
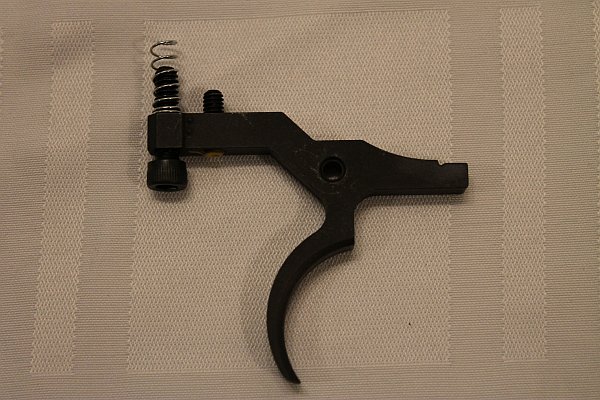
- Pack of four #10-24 UNC ¾” screws at Home Depot for $1.99 (only used one screw)
- Industrial strength spring kit at Princess Auto or your local hardware store for $9.99
Let the trigger job begin:
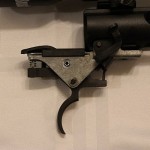
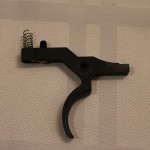
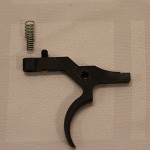
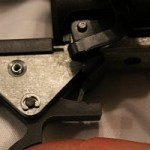
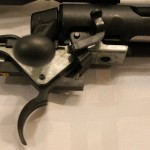
After checking the rifle, remove the stock to reveal the trigger assembly. Remove the E-clip (aka Jesus Clip), pivot pin, and trigger out from the assembly. From the spring kit, use a spring that will just fit on the new #10 screw and cut it to about ½” in length. With the stock trigger spring removed from the trigger, install the new #10 screw from the bottom and the newly cut spring on top. Use a little bit of blue Lock-Tite thread locker to guarantee the screw will stay in place after adjustment. I suggest blue Lock-Tite because you can loosen off the screw with the use of normal tools, while red will require heat and green (yes, there is such thing as a green Lock-Tite) will need a lot of good luck to come undone.

Install the trigger back into the assembly and adjust the screw before the Lock-Tite dries. I adjusted my screw so that when the sear breaks there is absolutely no overtravel. You can adjust your trigger to anything you want, but I prefer this setup. After the adjustments have been made, reinstall the stock and let the Lock-Tite dry. Note: Do not leave out the trigger spring. The spring is needed to prevent any accidental discharge while the rifle is being used. Also, do not adjust or remove the set screw used for the safety. This is perfectly set by the manufacturer and it will not work properly if adjusted or removed.
Improvements?
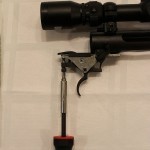
After the trigger job was completed, I was able to measure the weight of the trigger at an awesome 3lbs. Taking my Axis to the bush to try out this T-job, a group of 1 MOA was made using Federal Blue box 30-06, 150 grain. The feel of the trigger was a major improvement as it was very crisp and clean. To me it felt like a better trigger setup than some triggers used on more expensive rifles.
Now I had some extra 150 grain Winchester Silvertips that I use in my X-bolt so I figured I would give them a try. At 100 yards, the Silvertips reduced the size of the groups to ¾”. Awesome! But I’ll stick to the cheaper ammo so I won’t have to make cuts to my wife’s shopping budget. You know what they say, “happy wife, happy life!”
Conclusion
If you want a better trigger and don’t have a lot of cash to buy an aftermarket one, this fix is worth every nickel. The trigger is the one thing that holds the Savage Axis back. With this trigger mod installed, the Savage Axis moves up the ranks to being one of the best budget rifles on the market, hence why I have one in my arsenal.