The battery pack on my cordless vacuum slowly died. I think it was undersized to begin with: only giving me a maximum of 15 minutes of use (just the vacuum, not the brush), before giving up the ghost. After a while, just turning the brush on when the vacuum was on medium height carpet was too much. So I tore the damn thing open and tried replacing the battery pack rather than contributing to more e-waste in the world. This documentation is in case anyone out there wants to do this themselves. If you do try this yourself, be aware that:
- Unprotected li-ion batteries love to light on fire if you short, overcharge, or get them too hot
- You can burn your house down doing this kind of shit
- Don’t try this if you’re not comfortable with electronics, soldering, and wiring.

No user serviceable parts
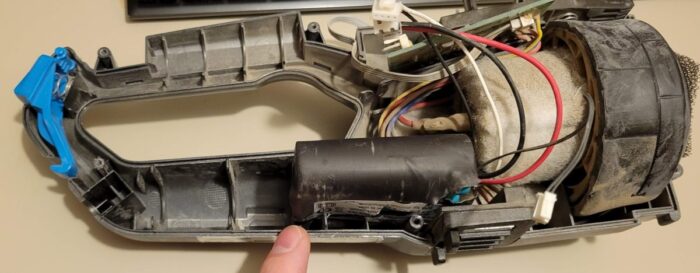
Not a huge surprise in today’s disposable age but the vacuum’s lithium ion battery pack was not user replaceable. Bissell will sell you a replacement brush, filters, even the anemic charger, but not a battery pack that’s easily unplugged.
Online, there are several lipo packs and you might even find an appropriate “3S” (3 – 18650 batteries in series) pack but nothing from Bissell. One thing that I noticed while I had it cracked open was that it looked like it’d take another set of batteries behind the 3 side-by-side batteries in the factory pack. Not quite enough room for another 3S pack but close!


The factory pack uses 3 – INR18650-20R Samsung batteries in series. These are fairly low capacity at 2000mAh but high-ish discharge at 22A max continuous discharge. So the whole pack together is 10-14V, 2000mAh, with a max discharge of 22A.

The replacement pack would have to be the same 10-14V range since the motor was rated for 10.8V.
I opted to replace the factory pack of 3 2000mAh batteries with 6 – 3000mAh batteries in a 3S2P configuration. This means I’d be using 2 – 3S packs to double the batteries mAh rating and amps. Because I was using this style of config, I could use batteries that had more storage and less peak amps. I opted for the Samsung 30Q batteries because they’re cheap and readily available. They’re not the highest capacity but I’m already ridiculously over factory capacity with them anyways.
Old battery pack: 2000mAh, 22A, max 15 minutes of runtime
New battery pack: 6000mAh, 30A, max 50 minutes of runtime
This extra capacity would mean the batteries would last much longer and they will be less stressed out.

Building the pack
Rather than solder directly to the cells and potentially damage them with the heat, I bought a cheap battery spot welder kit of Amazon. These are used to spot weld nickel strips to batteries to get a durable connection. I opted for a pretty cheap one (~$65) because I won’t need to build battery packs that often. But hey, maybe I’ll use it on the next pack to save another device from the landfill.

Because of how I needed to lay out the batteries, I had to do a bit of pre-planning on how to weld, solder, and arrange the batteries. This vacuum uses a BMS (Battery Management System) so you don’t just hook up the + and – and call it a day. You have to also hook up balance leads (2 wires that go in the middle of the pack so the BMS can monitor individual cells, and re-install the temp sensor so that it can turn off the vacuum if the batteries get too hot.
After Install
After installing the new pack and re-assembling the vacuum, I recharged the vacuum in a safe area where it couldn’t catch anything on fire. That took a good long while (about 24 hrs) because the factory charger is only good for 300mAh. After charging, I ran it in my garage from 100% until it died, which took 50 minutes. This was a stress test to make sure that it ran, charged, and didn’t light on fire at any point.
So yeah, now it runs FOREVER compared to before but it also takes a long time to charge back up to 100%. That’s ok for a small vacuum like this because you’re just using it once in a while and it’s OK to leave it on the charger. Had they assembled this with more battery capacity from the factory, the batteries would have lasted a lot longer, been less stressed out, and we’d have less e-waste in the world.